All new at the seed bank we have a mushroom growing technique that has proven effective, convenient, and incredibly simple. Great for the beginner and reliable for the experienced.
.jpeg)
The technique is simple. We blend a nutrient rich substrate and carefully place an even proportion of it in the bottom 1 & 1/2 inches of a full quart mason jar. Our lids are fixed with a red silicone innoculation port, then screwed snug (but not too tight) onto the jar. We then sterilize the jars, and after cooling they are ready to innoculate.

First thing you will need to do prior to innoculation is flame sterilize your needle. Sterility is EVERYTHING in mushroom cultivation. Wipe both the port and needs down with alcohol. Be careful when using alcohol around flame. First use the flame, then use the alcohol.

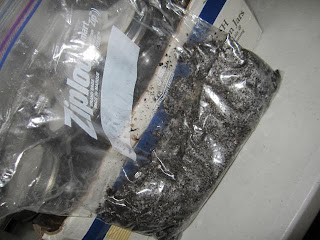
In about a week your jar(s) should be showing signs of pure white mycelium growth. At this point you may also see mold as a result of contamination. Though mold sucks and will end that jar, it is common and part of the learning curve. If you discover mold, remove the jar from your house ASAP and dispose of it outside. Mold spores will spread fast if let lose in your house. It should take anywhere from 1-4 weeks for the substrate to completely colonize. When it's done it should look like this:

Now that the jars are colonized you may choose to add a casing layer. This is optional but can help pin set. A casing layer is a thin layer (<1cm) of low nutrient 'top soil' that simply keeps moisture in and helps regulate fresh air exchange. To make this simply mix a handful of vermiculite and a handful of peat moss. Add enough water so the mix is thoroughly moist but not wet. Place the soil in a freezer ziplock bag, submerge in a pot of hot water (180 degrees f), and let sit for about an hour at this temp, then remove the sealed bag and let cool over night.

Then put the lid back on the jar(s) and shake the mix until the entire surface looks evenly covered.

Now to initiate fruiting. Once the casing layer is on, or if you chose not to case, fruiting is easy. First set the jar(s) in a spot where it/they will get light. Indirect sunlight is perfect. Next open each jar and mist with water. Any water will do, and just a couple squirts is all you'll need. Then screw the lids back on just snug, not tight. Repeat this misting process every day or two and soon you should see pin-heads (mushroom primordial) forming.

Once pins start showing continue misting every other day and watch as the mushrooms grow like magic! Once the mushroom fruit bodies have broken veil they are ready to harvest.

To harvest simply open the jars, wiggle the jars until the mycelium cake moves a bit closer to the top where u can get a good grip on the stems. Twist and pull. Harvest all that you can but leave the baby pin-heads that might be remaining as these will be your second flush.

To flush after first harvest simply pour enough water into the jars that the cake floats. Leave it soaking overnight with the lid on. Next day pour out the water and adjust so the cake is set back to how it was. Now just open the jar every other day for fresh air exchange. Mist if you need to but a simple fanning should be sufficient at this point. Second flush usually happens in about a week. The most flushes obtainable from this technique should be no more than 3. One or 2 is plenty.

Happy harvest! These per-sterilized jars are available now at our Victoria location for $15 a jar, or 4 jars + a spore syringe of your choice for $80.

.jpeg)
The technique is simple. We blend a nutrient rich substrate and carefully place an even proportion of it in the bottom 1 & 1/2 inches of a full quart mason jar. Our lids are fixed with a red silicone innoculation port, then screwed snug (but not too tight) onto the jar. We then sterilize the jars, and after cooling they are ready to innoculate.

First thing you will need to do prior to innoculation is flame sterilize your needle. Sterility is EVERYTHING in mushroom cultivation. Wipe both the port and needs down with alcohol. Be careful when using alcohol around flame. First use the flame, then use the alcohol.
STERILITY IS EVERYTHING!
After wiping everything down, innoculate the jar with about 2.5cc's of spore solution or liquid culture. Then carefully retract your needle, wipe everything off with alcohol, and place the jar(s) in a warm, dark place, like the cupboard above the fridge. The darker the better and the ideal temperature is around 80 degrees F, though temperature is not as important as darkness.
In about a week your jar(s) should be showing signs of pure white mycelium growth. At this point you may also see mold as a result of contamination. Though mold sucks and will end that jar, it is common and part of the learning curve. If you discover mold, remove the jar from your house ASAP and dispose of it outside. Mold spores will spread fast if let lose in your house. It should take anywhere from 1-4 weeks for the substrate to completely colonize. When it's done it should look like this:

Now that the jars are colonized you may choose to add a casing layer. This is optional but can help pin set. A casing layer is a thin layer (<1cm) of low nutrient 'top soil' that simply keeps moisture in and helps regulate fresh air exchange. To make this simply mix a handful of vermiculite and a handful of peat moss. Add enough water so the mix is thoroughly moist but not wet. Place the soil in a freezer ziplock bag, submerge in a pot of hot water (180 degrees f), and let sit for about an hour at this temp, then remove the sealed bag and let cool over night.

To add the casing layer simply open the In-vitro jar(s) and scoop a heaping tablespoon of mix right on top of the colonized substrate.


Now to initiate fruiting. Once the casing layer is on, or if you chose not to case, fruiting is easy. First set the jar(s) in a spot where it/they will get light. Indirect sunlight is perfect. Next open each jar and mist with water. Any water will do, and just a couple squirts is all you'll need. Then screw the lids back on just snug, not tight. Repeat this misting process every day or two and soon you should see pin-heads (mushroom primordial) forming.

Once pins start showing continue misting every other day and watch as the mushrooms grow like magic! Once the mushroom fruit bodies have broken veil they are ready to harvest.

To harvest simply open the jars, wiggle the jars until the mycelium cake moves a bit closer to the top where u can get a good grip on the stems. Twist and pull. Harvest all that you can but leave the baby pin-heads that might be remaining as these will be your second flush.

To flush after first harvest simply pour enough water into the jars that the cake floats. Leave it soaking overnight with the lid on. Next day pour out the water and adjust so the cake is set back to how it was. Now just open the jar every other day for fresh air exchange. Mist if you need to but a simple fanning should be sufficient at this point. Second flush usually happens in about a week. The most flushes obtainable from this technique should be no more than 3. One or 2 is plenty.

Happy harvest! These per-sterilized jars are available now at our Victoria location for $15 a jar, or 4 jars + a spore syringe of your choice for $80.

why is fruiting easy if i choose not to case?
ReplyDelete